Testing your Cloud Softphone build is easy because of the ease of provisioning provided in the Acrobits Cloud Softphone system. You only have to download the generic Cloud Softphone application to test the functionality of your build.
Note: Live testing uses your Cloud ID without an asterisk. For editable testing (sandbox), use the asterisk and follow this guide.
Downloading the Generic Cloud Softphone Application
After setting the application user interface design and some basic features for the app, download the Cloud Softphone generic application at the following sites:
- Android mobile app - Google Play at play.google.com/store/apps/details?id=cz.acrobits.softphone.cloudphone
- iOS mobile app -App Store apps.apple.com/us/app/cloud-softphone/id567475545
- macOS or Windows desktop apps - Go to providers.cloudsoftphone.com/dashboard and in the Generic Cloud Softphone binaries section, download the one compatible with your operating system.
Tips
To create testing accounts for your Cloud Softphone application, read more in the Testing Accounts Creation section at faq.acrobits.net/create-users-for-cloud-softphone.
Testing Android App
Open the Cloud Softphone application, and the login screen displays.
There are two ways to log in:
- Enter the Cloud ID and Password using one of your SIP accounts or using the testing account created in the Testing account settings on the portal. Then, select the Sign In button.
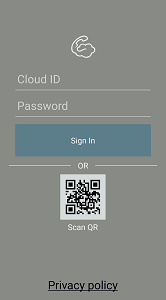
- Tap the QR image on the screen and scan the QR code generated at by providers.cloudsoftphone.com/qrgenerator/index for testing purposes.
Testing iOS App
Open the Cloud Softphone application and the login screen displays.
There are two ways to log in:
- Enter the Cloud ID and Password using one of your SIP accounts or using the testing account created in the Testing account settings on the portal. Then, select the Sign In button.

- Tap the QR image on the screen and scan the QR code generated at by providers.cloudsoftphone.com/qrgenerator/index for testing purposes.
Testing macOS or Windows Desktop App
Open the Cloud Softphone application and the login screen displays.
Enter the Cloud ID and Password using one of your SIP accounts or using the testing account created in the Testing account settings on the portal. Then, select the Sign In button.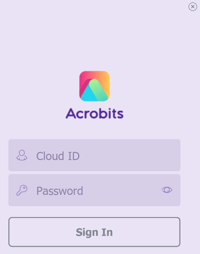
Step-by-step (live testing)
- Install and open your Cloud Softphone or white-label app on a test device.
- Reset the app to force reprovisioning, then relaunch.
- Provision the live version using one of the methods below:
- Classic initial screen (generic app): Enter your Cloud ID, then your username and password. Example:
CLOUDID(no asterisk). - Registration Wizard (white-label app): Enter the requested field (often your phone number). The Cloud ID is embedded, so you only provide your details.
- QR code or link: Use a live format such as
csc:username:password@CLOUDID. If username or password are omitted, the app will ask for them.
- Classic initial screen (generic app): Enter your Cloud ID, then your username and password. Example:
- Wait for the app to register. You should see a “registered” or similar status.
- Place one outbound and one inbound call. Verify audio both ways.
- Check any enabled features, for example voicemail, messaging, and push.
Troubleshooting
- Settings look wrong: You may have loaded the editable copy. Reset and provision again without the asterisk.
- Cannot register: Recheck Cloud ID and credentials. Confirm network access to your SIP server.
- QR/link fails: Verify the format
csc:username:password@CLOUDID. URL-encode username or password if they contain special characters.
See also: What are the methods of provisioning?